Your First Insulin Injection: How To Do It Without Fear
Claire Greenway
BVM&S MRCVS
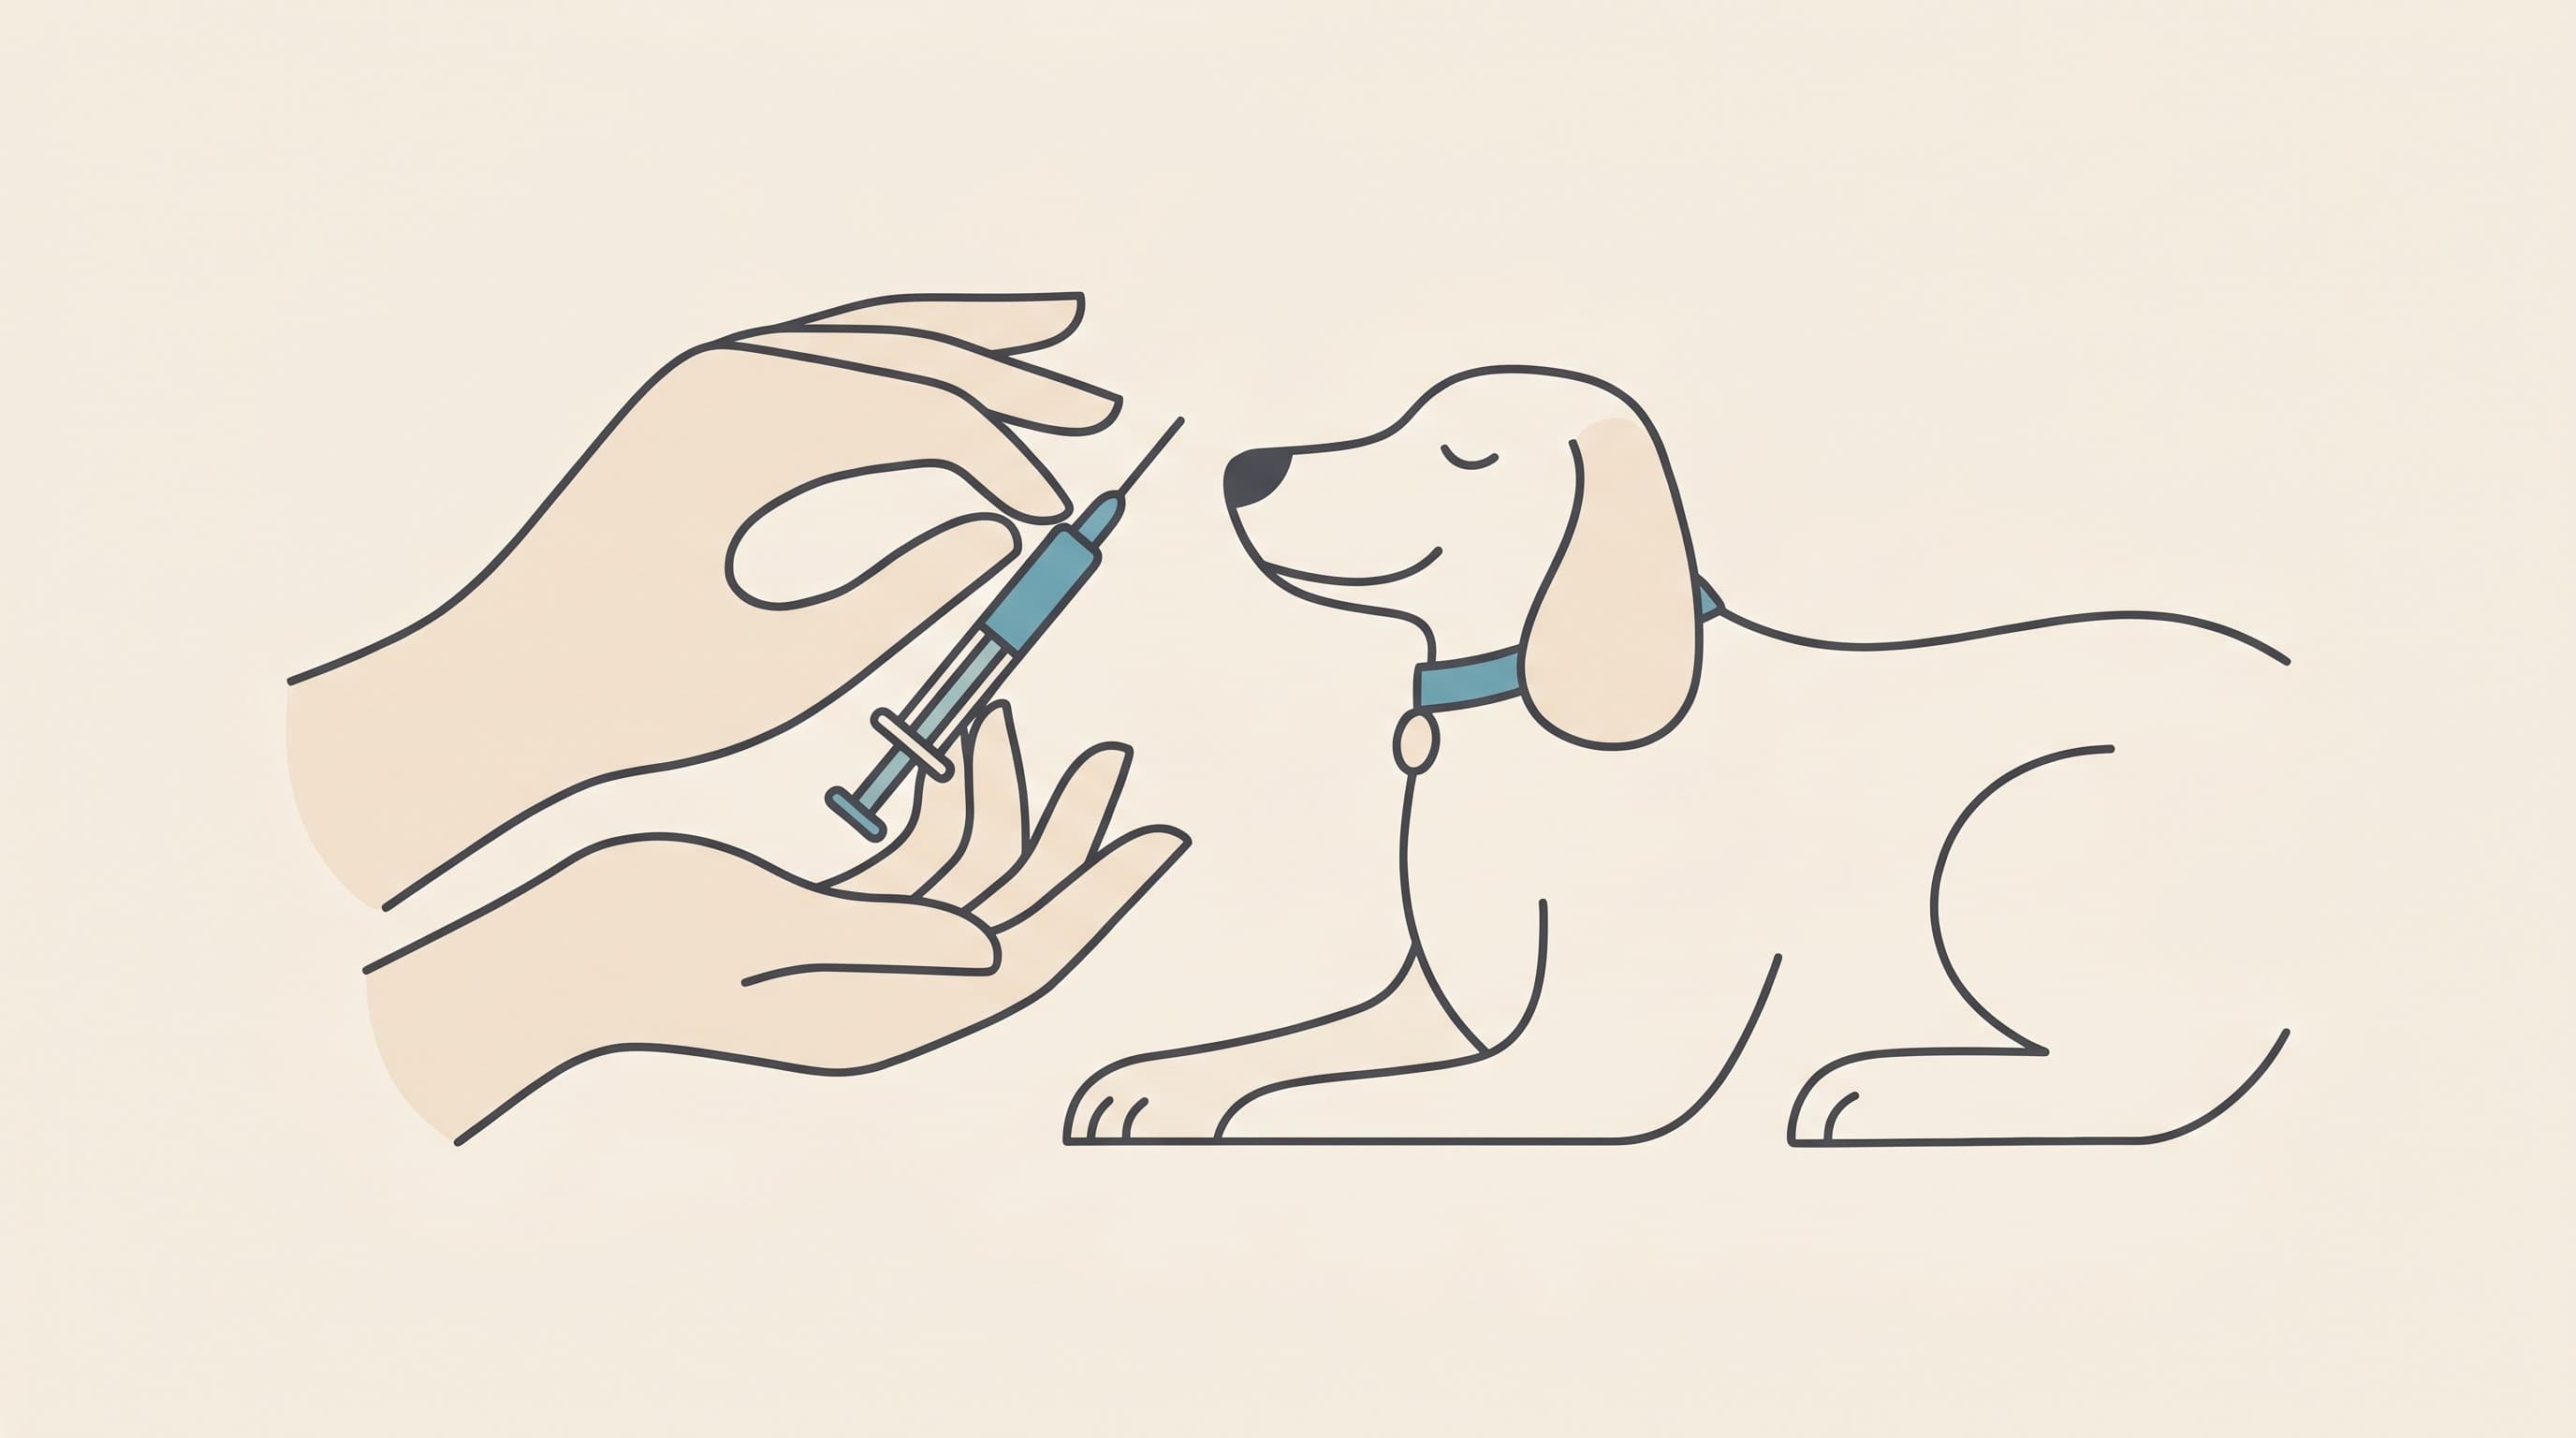
There's a moment I've come to recognise in the consult room. The owner has the diagnosis and the kit, they've nodded along to everything, and then I hand them a loaded syringe to try for the first time and their hand goes very still. They're not frightened for themselves. They're frightened of pushing a needle into an animal they love and hurting it. If that's where you are, with the kit on the kitchen table and a knot in your stomach, let me talk you through it the way I would across the desk.
Here's the honest headline, and I mean it clinically: within a week or so this becomes a ten-second non-event, and the fear is almost all in the anticipation. But first, two safety rules that matter more than any technique.
Two rules that come before you ever pick up the syringe
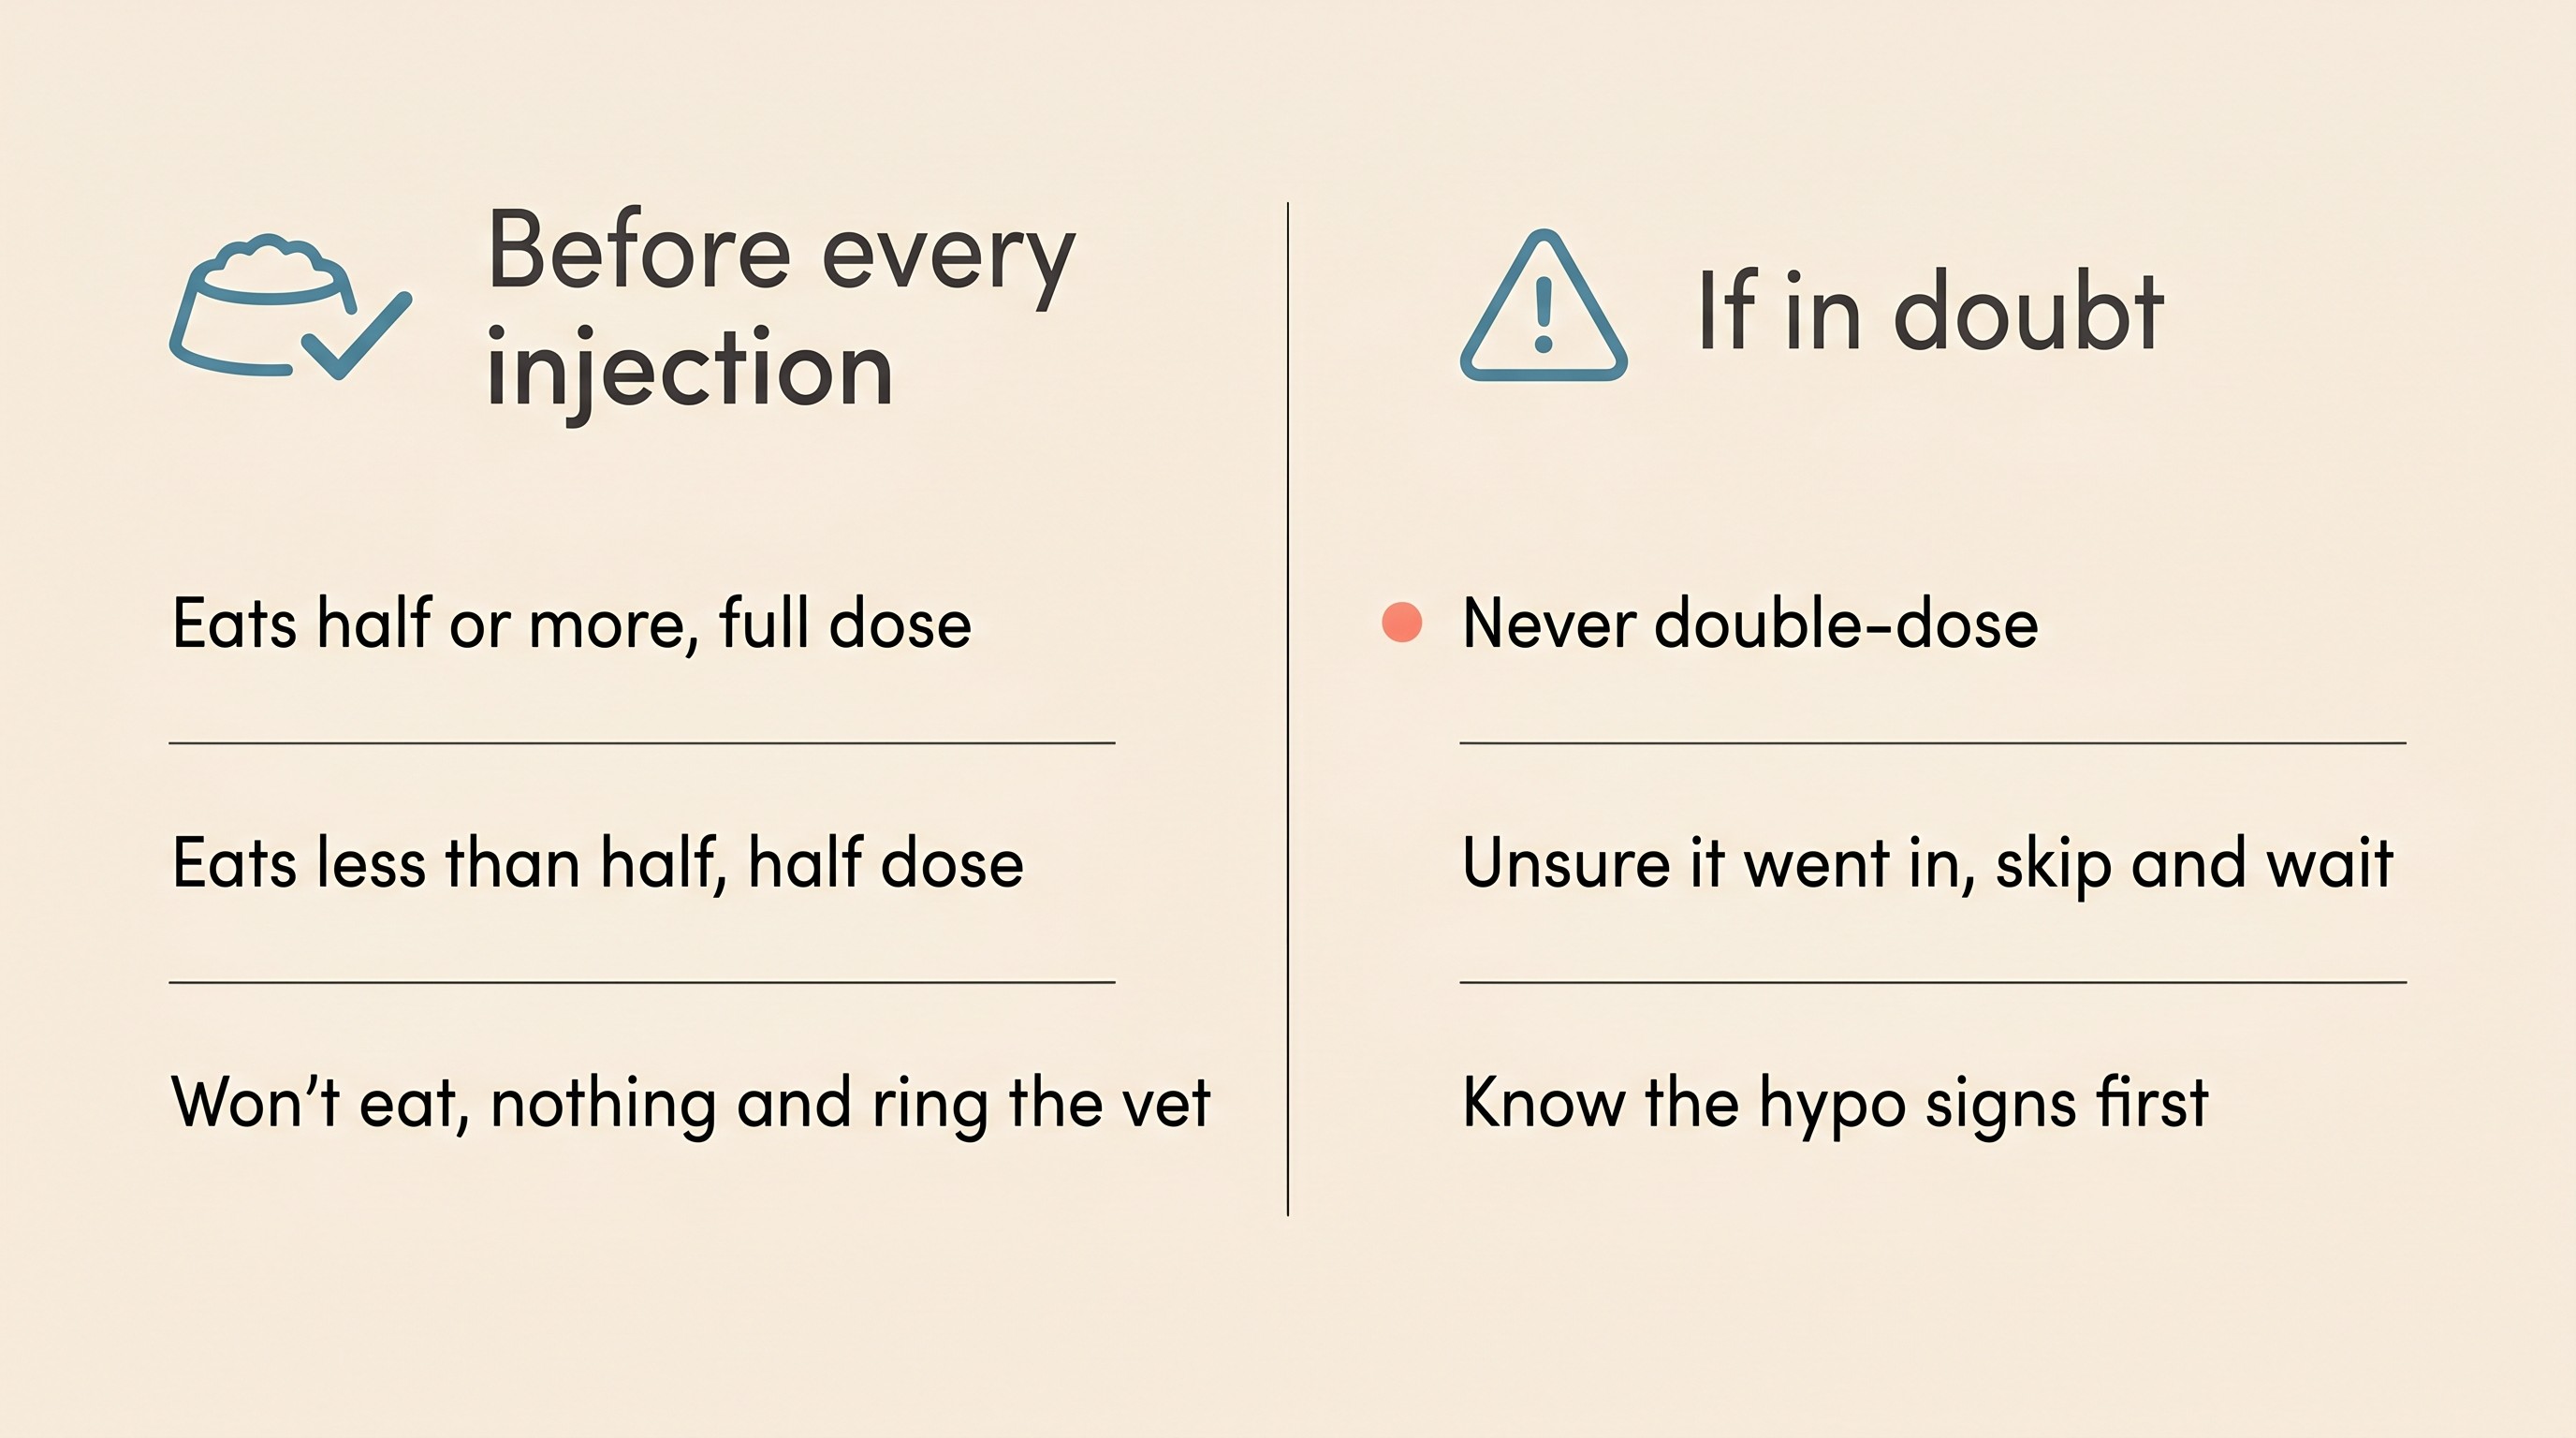
The first rule is feed first. Insulin is given with food, normally just as your pet starts eating, twice a day with their meals (Behrend et al., 2018; Williams & Downing, n.d.). Once a dose is in you cannot take it back, and it needs the incoming sugar from the meal to balance against. Inject before a refused breakfast and you've lowered the blood sugar with nothing to counter it. So the order is always the same: food down, watch them actually eat it, then the insulin follows (Williams & Downing, n.d.).
That leads to the question every owner asks next: what if they don't finish it? The convention most vets teach, unless yours says otherwise, is in the card below. Eat roughly half or more, give the full dose. Eat less than half, give a half dose. A wholly refused meal, or two in a row, means no insulin and a phone call to your vet (Behrend et al., 2018; Williams & Downing, n.d.). Treat that as a sensible default, not an iron law: if your vet has set a different plan, theirs wins. The fuller feeding picture belongs to feeding a diabetic pet.
The second rule is the one I'd write on the inside of every owner's wrist if I could. Never double-dose, and never try to "make up" a dose you think you missed. If you're ever unsure whether the insulin actually went in, the safe move is always the same: skip it, and wait for the next scheduled injection (Williams & Downing, n.d.). A missed dose is a harmless blip the next one corrects; a double dose can drop the blood sugar dangerously low. So the answer is never "I'd better give it again just to be safe." The same logic sits inside the Glucose Companion: an uncertain dose is logged as skipped, not chased.
Tied to that, learn the signs of a low blood sugar, a "hypo", before your first injection rather than after. A hypo is the one true emergency of diabetes treatment: your pet goes wobbly, weak, dull or trembly, and if it isn't caught it can progress to collapse or seizures (Behrend et al., 2018; Taylor et al., 2025). The first aid is to rub something sugary, honey, glucose gel or sugar syrup, onto the gums, never pouring liquid into a mouth that can't swallow, then get to a vet straight away. You never give more insulin to a pet you suspect is hypo. It has its own full guide, hypos: the emergency every diabetic owner must be ready for, and I'd ask you to read it before your first dose: not because a hypo is likely on day one, but because the time to learn the rescue is before you need it.
The one setup check that prevents a serious error
Before we go near a needle, one quiet detail causes some of the most dangerous dosing mistakes in diabetes care, and it has nothing to do with how you inject. It's matching your syringe to your insulin.
Insulin comes in different concentrations, and the syringe has to match it exactly. Most veterinary insulins used in the UK, including Caninsulin and the cat insulin ProZinc, are U-40 strength, forty units per millilitre, and need U-40 syringes (usually red-capped) or the matching VetPen (Caninsulin SPC; Thompson et al., 2015). Human insulins such as glargine (Lantus) and detemir (Levemir) are U-100, a hundred units per millilitre, and need U-100 syringes (University of Minnesota, n.d.). The danger lies in the gap between those numbers. Because U-100 insulin is two and a half times more concentrated, drawing it to a "ten unit" mark on a U-40 syringe delivers about two and a half times the intended dose, a serious overdose; the reverse, a U-40 insulin measured on a U-100 syringe, gives only about 40%, leaving your pet stubbornly high as though the insulin had failed (Thompson et al., 2015; University of Minnesota, n.d.).
You don't have to manage this maths, and you shouldn't try. Your vet matched the syringe to the insulin when they set you up, and your single job is never to change it: no substituted or borrowed syringe goes into that vial without someone confirming the concentration still matches (University of Minnesota, n.d.). The full detail, including drawing up accurately and disposing of sharps, lives in storing, drawing up and handling insulin properly; here it's just the one setup check I want lodged in your mind.
Drawing it up
With the safety rules understood and the syringe matched, the mechanics are genuinely straightforward. A cloudy insulin like Caninsulin or ProZinc is a suspension, a fine cloud of particles in liquid, and it has to be mixed first so the dose is spread evenly through what you draw up. Ignore the blanket "roll, never shake" line you may have read, which is a rule for one particular human insulin, not a universal one. Follow your own product's leaflet: Caninsulin, for instance, is shaken thoroughly until uniformly milky, letting any foam settle before you draw up; clear insulins like glargine and detemir aren't mixed at all (Caninsulin SPC; Thompson et al., 2015; Williams & Downing, n.d.). The aim, whichever product you have, is a uniform mix without whipping up foam (Williams & Downing, n.d.). Then draw up the exact prescribed dose and flick out any air bubbles, since a bubble takes up room that should hold insulin and quietly under-doses your pet. The fuller drawing-up technique, and which device is most accurate for tiny doses, lives in storing and handling insulin; the principle here is simple, that the dose you measure is the dose your pet gets (Thompson et al., 2015).
Where, and how, to inject
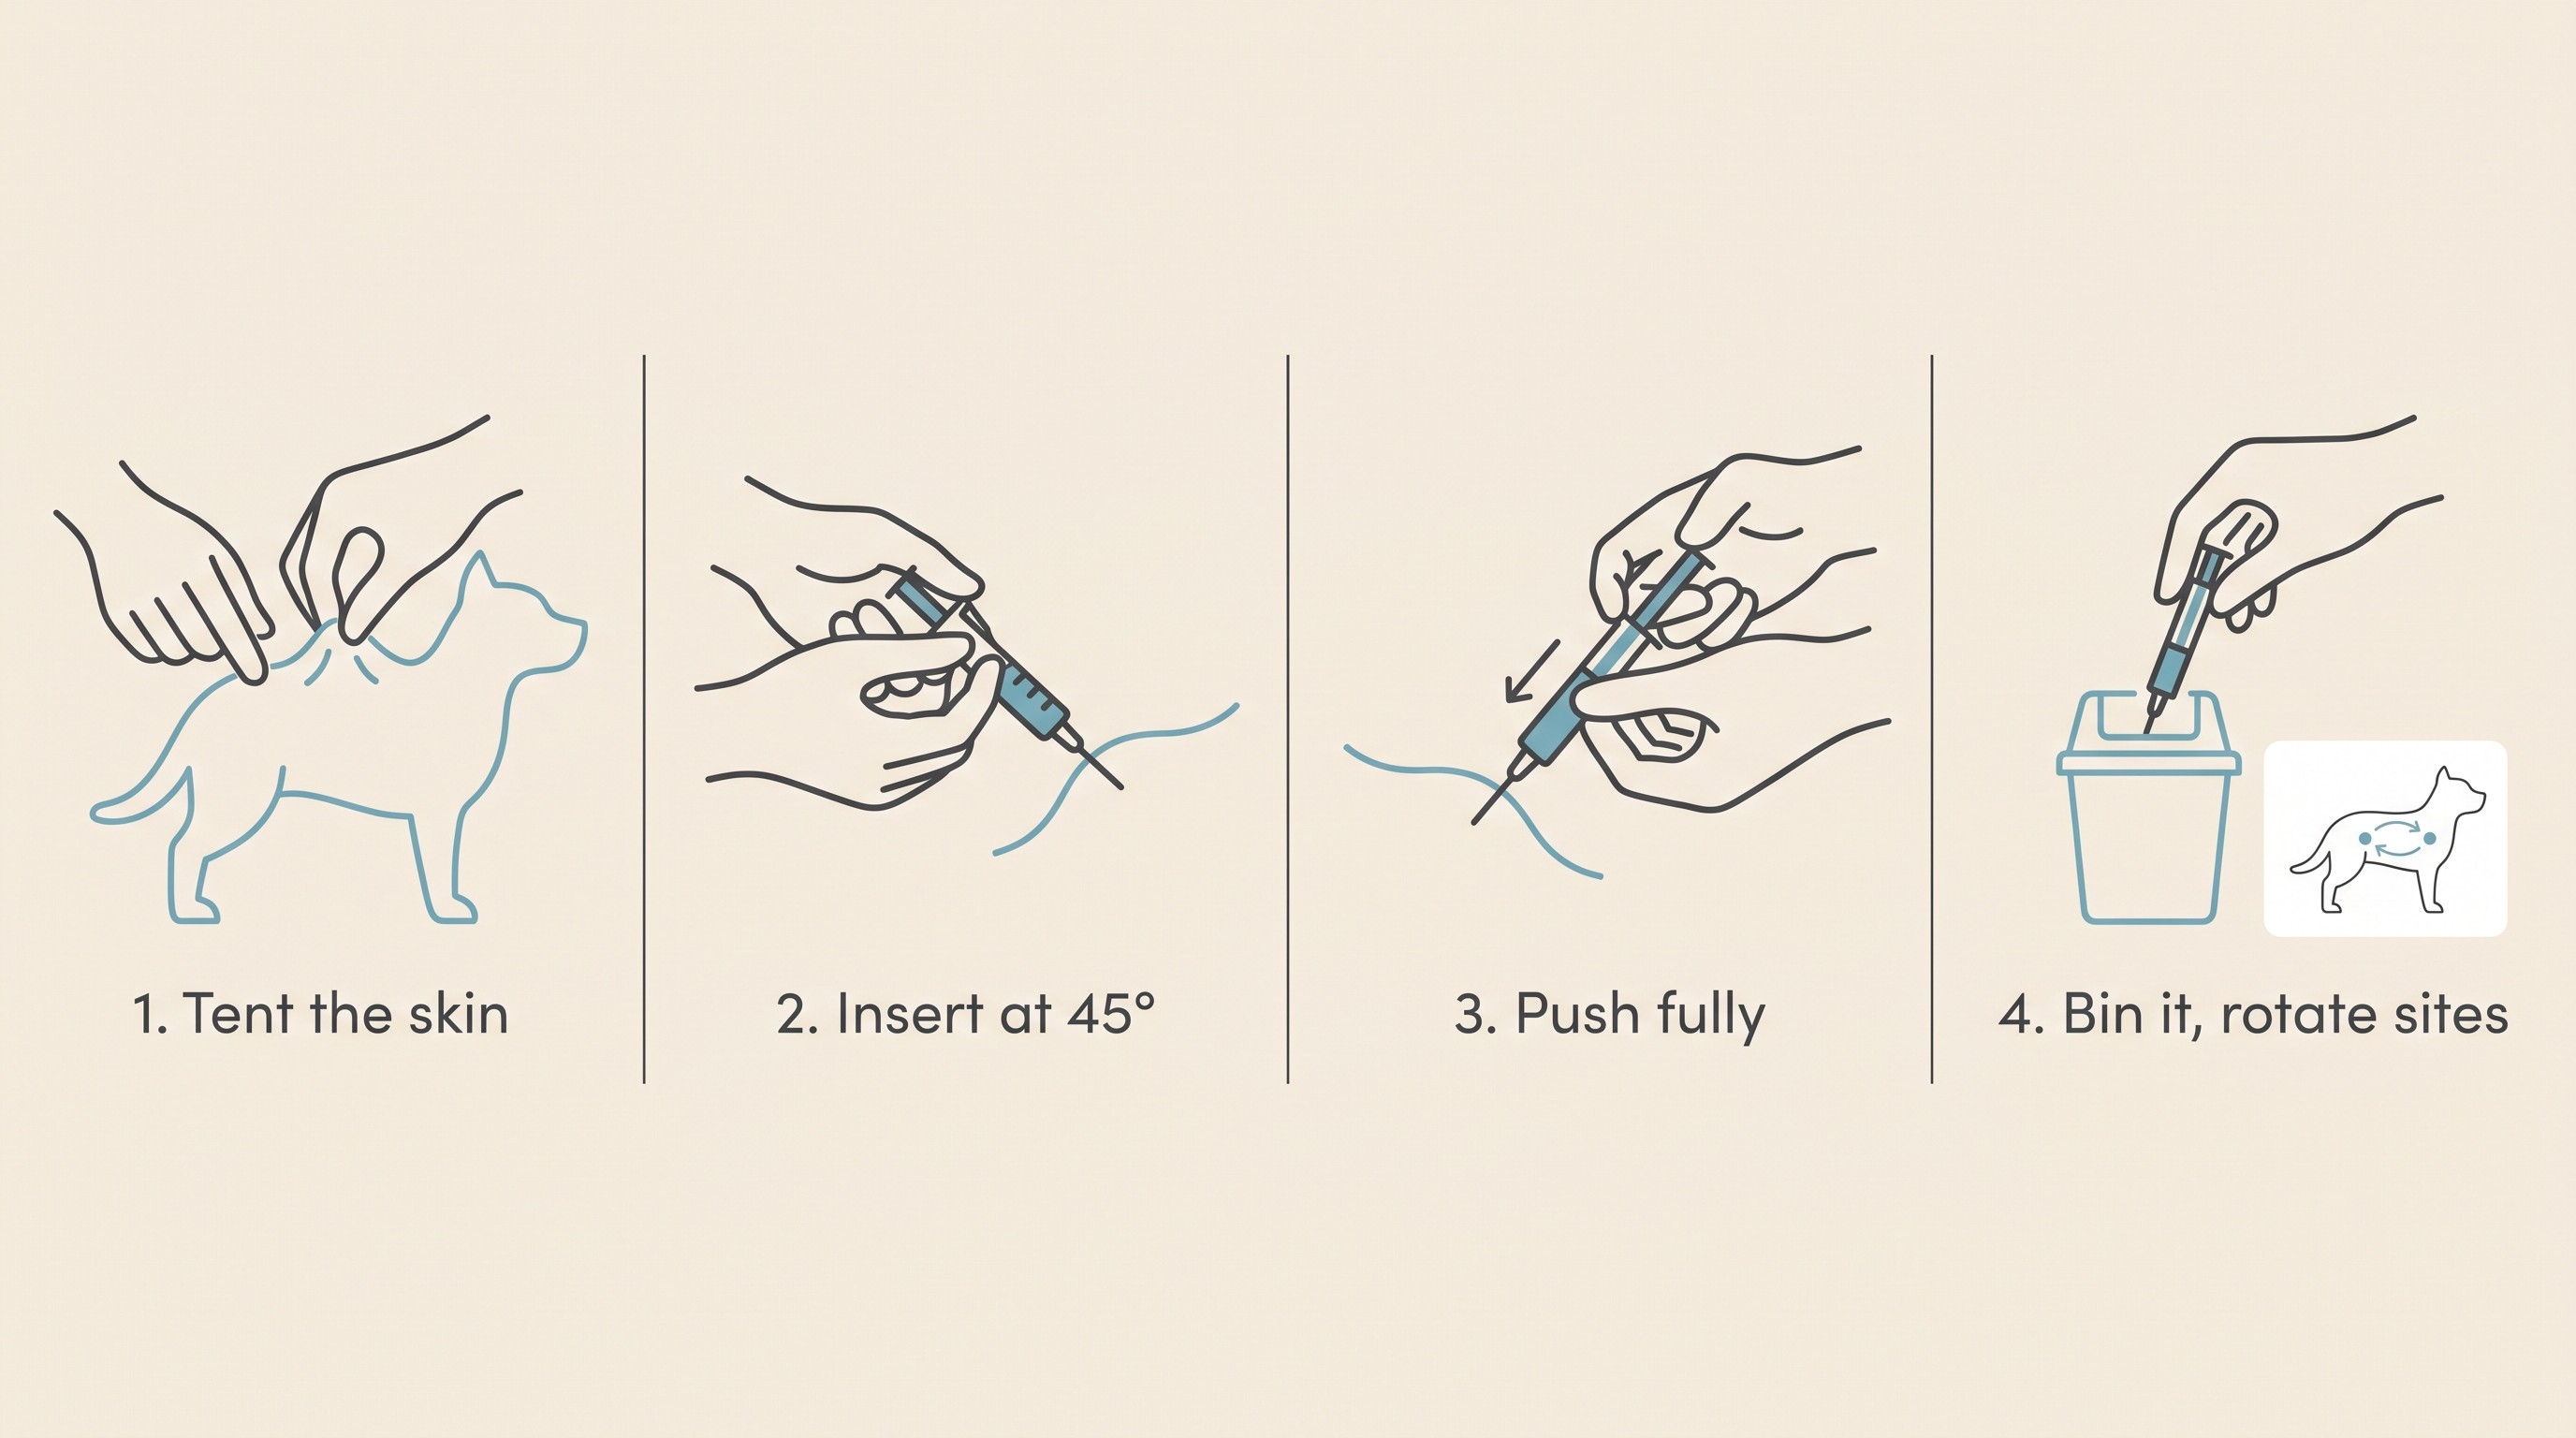
Now the part you've been dreading, which is about to become the part you stop thinking about. Insulin goes under the skin, not into muscle, and the loose, mobile skin over the back and flank is ideal. Aim a couple of centimetres out from the spine, anywhere from behind the shoulder blades to the lower back, alternating sides and spots each time so no one patch is overused (Caninsulin SPC). One old habit is worth correcting, if you've been told to "jab the scruff": the neck scruff is now considered a poor site, because it has a sparse blood supply so it absorbs insulin less reliably, and repeated injections in any single spot build scar tissue that absorbs worse still over time (Thompson et al., 2015; Behrend et al., 2018). The loose skin of the back and flank, with sites rotated, is both better absorbed and well tolerated (Caninsulin SPC).
The technique itself is a tent. With one hand, gently lift a fold of that loose skin between your thumb and two fingers. With the other, slide the needle into the centre of the tent, at roughly forty-five degrees or as your syringe is designed for, push the plunger all the way down, then withdraw and drop the syringe into a sharps bin (Caninsulin SPC; Williams & Downing, n.d.). You don't need to pull back on the plunger to "check" first; that belongs to injections into a vein, not under the skin. Always use the syringe your vet supplied: its short needle is matched to your pet, and one too short can drop the insulin into the skin rather than beneath it, where it absorbs poorly (Thompson et al., 2015).
This is where fear and reality part company. Pet insulin needles are extremely fine, and the loose skin over the back has very few pain-sensitive nerve endings, so in twenty years of teaching owners this I can tell you the overwhelming majority simply don't react, many eating right through it; and injection-site problems are genuinely uncommon when the technique is sound (Caninsulin SPC; Thompson et al., 2015).
To keep injections easy for years, make them pleasant from the first one. You're injecting around a meal anyway, so many pets take it mid-bowl, and pairing each injection with a treat or a fuss builds a positive association that pays you back every day (Fear Free, n.d.).
The what-ifs, and what they mean
Two things in the first weeks reliably worry new owners, so let me name them before they catch you out. The first is wet fur. You may feel a damp patch on the coat or your fingers after withdrawing the needle, which can mean a little insulin tracked back out, or that the needle passed clean through the far wall of the tent so the dose sprayed onto the fur, the so-called "fur shot". This is exactly where the second safety rule earns its keep: if you suspect the dose didn't fully go in, you do not re-inject to top it up, you skip and wait for the next scheduled dose (Williams & Downing, n.d.). A few hours running a little high is harmless; guessing at "a bit more" is how a hypo happens.
The second is the meter. If you've been given a glucometer, bear in mind that a human-calibrated one tends to under-read a pet's blood, so a pet-calibrated meter is the one to trust, and an alarming low on the wrong meter shouldn't push you into anything rash with the insulin (Domori et al., 2014). Don't chase a single startling number in any case; it's the trend, alongside how your pet looks, that matters. Monitoring properly belongs to the Glucose Companion.
Beyond those, you'll settle into the twice-daily rhythm, two injections about twelve hours apart, each with a meal, with the same food, amount, times and dose keeping your pet's insulin need predictable (Behrend et al., 2018), and what's normal in that early settling-in period is laid out in the first two weeks on insulin. One last thing worth saying plainly: the technique is identical for a dog or a cat, but the disease underneath is not. A diabetic dog needs insulin for life, whereas some cats, with good control caught early, can go into remission and come off it altogether (Behrend et al., 2018; Taylor et al., 2025), a split laid out in the same word, two different diseases.
So here is where I'd leave you, on the edge of the first one. Give it a week. Feed, draw up, tent, inject, treat, log, repeat. The hand that's so still right now will be doing all of this on autopilot far sooner than you can quite believe. Log each dose and meal in the Glucose Companion as you go, because those first scrappy notes turn into gold at the first recheck. You're at the hardest point right now, the one before you've started, and it eases with almost every injection from here, your pet about to feel a great deal better for it.
References
- Behrend, E., Holford, A., Lathan, P., Rucinsky, R., & Schulman, R. (2018). 2018 AAHA Diabetes Management Guidelines for Dogs and Cats. Journal of the American Animal Hospital Association, 54(1), 1-21.
- Caninsulin SPC. Caninsulin 40 IU/ml Suspension for Injection: Summary of Product Characteristics and owner instructions. MSD Animal Health UK.
- Domori, A., Sunahara, A., Tateno, M., Miyama, T. S., Setoguchi, A., & Endo, Y. (2014). The clinical utility of two human portable blood glucose meters in canine and feline practice. Veterinary Clinical Pathology, 43(1), 55-62.
- Fear Free. (n.d.). Fear Free Injection Training for Your Diabetic Pet. Fear Free Happy Homes.
- Taylor, S., Cannon, M., Church, D., Fleeman, L., Fracassi, F., Gilor, C., Mott, J., & Niessen, S. (2025). 2025 iCatCare consensus guidelines on the diagnosis and management of diabetes mellitus in cats. Journal of Feline Medicine and Surgery, 27(11), 1098612X251399103.
- Thompson, A., Lathan, P., & Fleeman, L. (2015). Update on insulin treatment for dogs and cats: insulin dosing pens and more. Veterinary Medicine: Research and Reports, 6, 129-142.
- University of Minnesota. (n.d.). Insulin Syringes: Difference between U-100 and U-40. Veterinary Clinical Skills Compendium.
- Williams, K., & Downing, R. (n.d.). Diabetes Mellitus: Insulin Treatment in Dogs. VCA Animal Hospitals knowledge base.
Keep track of how your pet is doing
The owners who cope best are the ones who notice changes early. A simple health log shows you what is working, and what is not, before the next vet visit.
Start tracking, freeYou're not doing this alone
Compare treatment journeys and talk to owners managing diabetes mellitus. Free to join.
Join PetsLikeMine